AWS CloudFront Housekeeping: Programmatically Cleaning the Cache

Content Delivery Networks (“CDNs”) do a good job of keeping themselves clean and up-to-date. However, sometimes the origin systems/applications/webpages we are using go through a big update and/or we’d like to have a hard cut-over to a new edition or version of our sites. Having the old versions of the files hanging around in the CDN could cause delays in the roll out, or strange behaviors in our web application.
Why you’re doing this, doing it once for exposure, and what’s happening
To flush out this old stuff, we will want to clear out the cache – the AWS CloudFront term for this is an “invalidation.” This is more than a nit-pick, because we invoke the “create-invalidation” command / SDK method in order to go about doing it. Invalidations are executed against a specific CloudFront Distribution.
This can be done from the AWS Management Console easily enough; I’m going to step through that quickly to introduce the basics that will help explain how to execute the functionality programmatically.
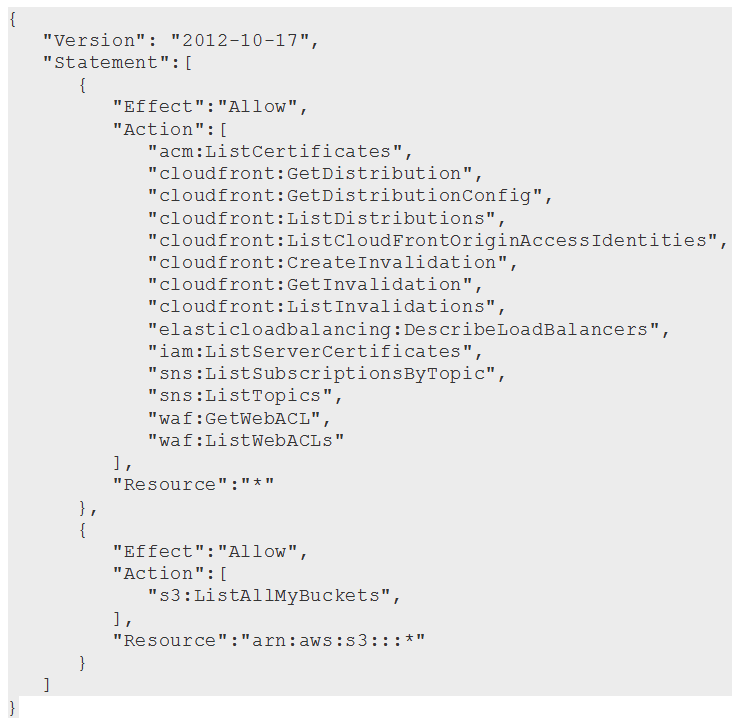
Before I start explaining how and why, a foundational basic first: You have to have the authorization to take these actions I am about to describe. The following is the “straight from the manual” IAM permissions policy that will need to be in effect for your user/role to work with invalidations. Of course a full admin or full CloudFront permission would work as well, but here is the least permissive policy.
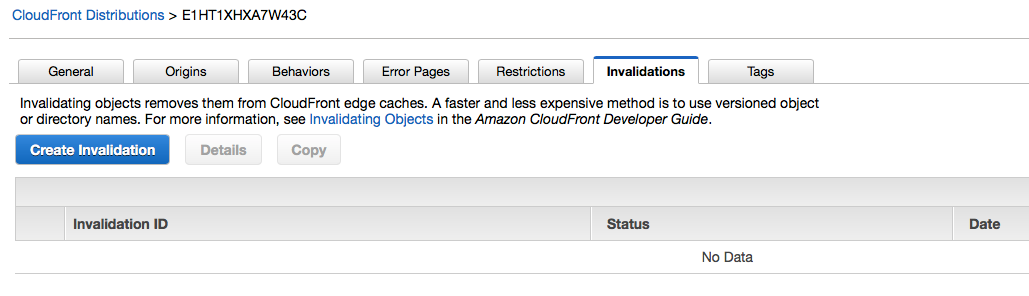
Assuming that all the permissions are in order, lets get started. First, bring up your CloudFront Distribution in the AWS Console and choose “Invalidations.” (AWS Console -> CloudFront -> Distributions -> Invalidations tab)
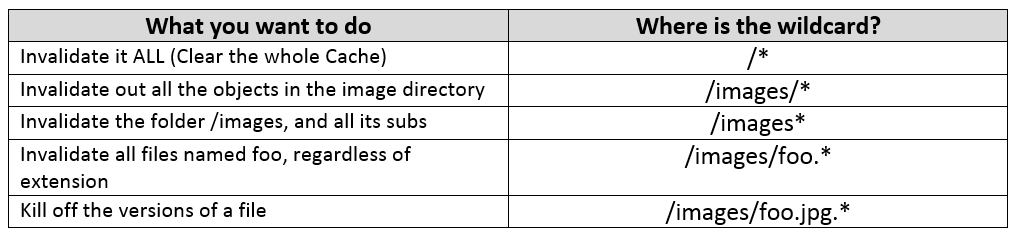
Now the rubber hits the road; indicate which elements of your cached site that you want to flush. Just like all important things, the paths are case sensitive, so attention to detail is key here. Also, you can use wildcards to take out entire roots, directories, etc.
Paths are relevant to the distribution, so http://xxxxxxxx.cloudfront.net/images/banners would be referred to as “/images/banners.”
Wildcards in your path declarations are an option and are a powerful tool when working with invalidations — again, attention to detail is needed when working with them however. With that in mind, I’ve whipped up a cheat sheet based on the docs for you:
The screen you use in the console looks like this. Press enter after each of your invalidation paths. The action of invoking/running the invalidation doesn’t trigger until you hit the pretty blue button.
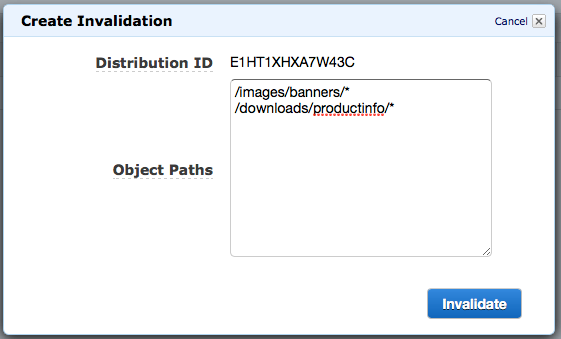
Be sure you really want to do this before hitting the “Invalidate” button – once you push it, there is no stopping it.
Oh, and you could be charged for this action too.
CloudFront allows the first 1,000 paths requested for invalidation a month to happen at no charge. After that you get clipped for $0.005 per path requested for invalidation. Paths you enter with a wildcard tally up to equal the number of paths/URL’s that get removed. It’s not a lot of money, but just be aware that it will happen should you cross that 1,000 object/URL line.
Pretty easy huh? Once you have created an Invalidation, you can re-run it later. An invalidation takes about 10 minutes or less to run across the CDN edge, so don’t expect immediate results.
If you trigger an invalidation by accident, there is no need to get too excited. As your site is accessed going forward, CloudFront will start caching the content you invalidated again as it is requested, and all will be right with the world in time.
Evolving from Mouse Thrashing to Key Tickling
Sometimes, you don’t want to personally “click-click-type-click” your way through the Console to trigger an invalidation. Replacing yourself with a tiny script has the advantage of empowering others and, more importantly, giving you more time AFK (“Away From Keyboard”) if you want to schedule the action or trigger it with other programmatic activities.
Understanding the Command Line Interface (CLI) method of doing this helps with understanding how the API’s and SDK’s process the request. In my opinion, working with the CLI almost always is the best way to learn something new, as well as what the SDK’s will need to execute the action.
The commands to invalidate content from the CLI are still technically in the “preview stage.” If you are not aware, AWS keeps things in this stage for awhile, for better or worse. To enable access to the feature on the CLI, you have to run the following command to pop-off the safety:
![]()
Alright, we are ready to dive in; the instruction we will be utilizing is the “create-invalidation” command:
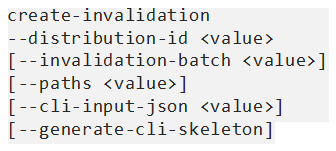
Check out the docs for an explanation of all the switches, but I’ll cover the important ones below.
- distribution-id – The ID of your CloudFront distribution. –REQUIRED--
- invalidation-batch – A JSON file that you can create to hold all of your invalidation paths and a few variables. Frankly, this is infinitely safer than tossing them on the command line.
- paths – Okay, if you are a Keyboard Cowboy, you can toss a space separated list of paths after this switch to invalidate. Don’t say I didn’t warn you.
The way I get this started is to build my invocation JSON file, I tend to name them invbatch-[PURPOSE].json. The file needs to follow this format:
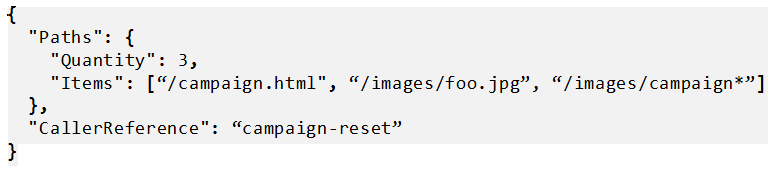
Pretty self explanatory really. “CallerReference” lets you name the invalidation. If you leave this blank or use the command line, AWS makes something up for you that isn’t remotely human readable. This value will need to be unique between unique invalidation requests, because you can reference this value to re-trigger the same request, should you need to.
Bringing it all together, the command line to execute this invalidation looks like this:

Once you trigger that command, the system leaps into action. It will return a JSON output to your screen that reports the status, and parrots back the configuration you built for the action. In the background, the CloudFront platform starts yanking out all the objects that match your URL patterns.
Code Monkeys – Here’s your Huckleberry
So you can take the command above & supporting invbatch files and execute them in a cron, or if you would like to integrate a invalidation event into your operations, you can use the various SDK’s to get things done.
Looking at the CLI has given you the grounding to tackle the task in all of the supported SDKs. Each one is structured appropriately to the language applied. Click the label link to get to the reference to see an example along with the expected formatting of the variables we used the command line.
PHP

Node.js
![]()
Like Modules? Here is another option for Node.js
I’ve played a little with a node.js module called “Void” that takes care of this as well. It’s still in development, but it’s a nice little self contained (but relies on the AWS Node.js SDK) module to kick this sort of thing off.
Phython

.NET

Other options – Version Control Design Operations
Invalidation requests have a few draw backs we illuminated earlier – the biggest two being possible cost and delay in effect. The alternative way to getting “refresh” functionality for big changes is to use a versioning control pattern with your CloudFront deployment. This is less of a monolithic feature or command and more of an operations methodology that relies on a few characteristics of CloudFront and your origin application/webpage.
HEADS UP – This has nothing to do with S3 Versioning what-so-ever
String Based Versioning – Using this method you take advantage of the “Forward Query Strings” function of CloudFront and pass a variable back to the Origin to select the object for CloudFront to cache. It would look something like this: “/images/foo.jpg?version=12” In essence, you modify your application/website to request the new version of the object and CloudFront asks the Origin Server for that version to cache. This method must be supported by your application/backend Origin Server.
Filename Modification – This method has a few different ways to implement, but works in the same basic manner. Through your application and origin servers, you modify the filename of the “current” version of the file/object you want cached. Like the first method, as soon as the new request is seen by CloudFront, it updates the cache. Again, most of this magic is triggered by the back-end Origin Server configuration.
Something to keep in mind – using either Version Control element above in your site/distribution design relies on your expiration settings in CloudFront to keep your cache size down – which in turn has a cost consideration as well.
Integrating a Version Control Design Operation into your site/application is a step beyond simply fronting your web presence with a CDN. It is something that you design or re-factor to support. I’ll probably write another blog on VCDO, as I call it, in the future – my simplified summary above was only meant to show you that other options exist. You can read more about the concept here.
Related Blog Posts